Whilst perusing my Google Reader app, I came across this article showcasing the supposed "worst" makeup on the internet--basically displaying pics of women (not celebrities--just everyday people like you and me) and mocking them in the snarkiest, most mean-spirited, schoolyard bully fashion. Since my blog is about how to have fun with beauty and it's written by an amateur with some pretty shaky self-esteem and questionable makeup skills, I can't help but feel like one of my looks could have easily been part of the article. Thus, a nerve was hit and, like Christine of Temptalia.com, who wrote this awesome response to the original article, I'm taking to my own piddly little internet soapbox and here's what I have to say:
As women, we face scrutiny, criticism and attacks on our self esteem every where we turn. The last place we need to find this kind of negativity is on a large, supposedly professional beauty-focused website. The fact of the matter is, Beautyriot.com's article is poorly researched (many of the makeup looks mocked by the article are THEMED and CHARACTER looks, not intended to be worn every day), terribly written, unenlightening, unentertaining, in the poorest of taste, petty, immature and really the only joke is on Beauty Riot itself for allowing such crap to appear on their site.
Like Christine of Temptalia touched on in her own response, we live in a far too negative, far too critical world. The women who posted these pics did NOT do it with the intention of being cruelly and shallowly laughed at by a large website that is an entity unto itself. They did it because they recognize that makeup is FUN. Color is FUN and we should be allowed to play with it and use it as a vehicle for self expression--whether we are trying to be prettier or create a character or illustrate a theme.
Whoever wrote this awful article needs to issue an apology to every last woman in every last picture featured. To the women themselves, and to ALL women for that matter, all I have to say is if you enjoy creating and rocking these kinds of looks, then that is ALL that matters! Makeup is art and art, like beauty, is in the eye of the beholder.. This article is just another example of why we need to stop worrying about what the rest of the world thinks, just love ourselves, strut like the QUEENS we are and let the hate fall into the dust we leave in our tracks.
<end rant--back to our regular scheduled programming...or lack thereof>
Monday, August 27, 2012
Yep, still alive and I even did a glitter gradient!
Much like a bad penny or a poltergeist, I'm BAAA-AAAAACK...and look what I did:


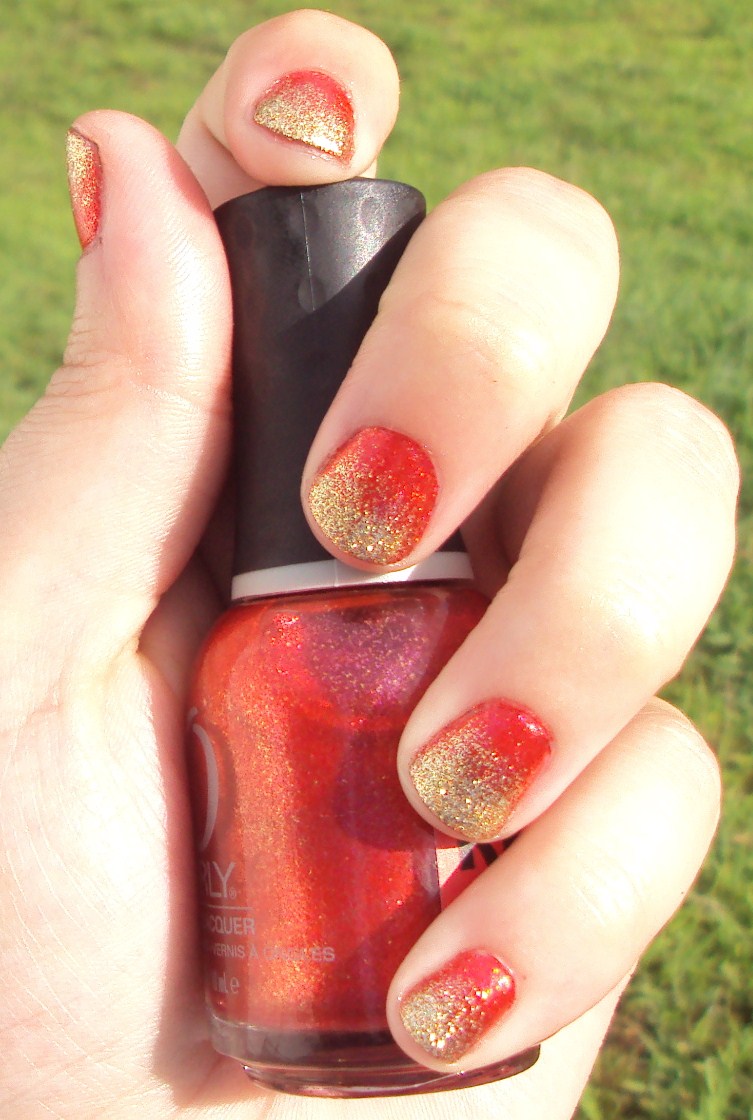
My first ever glitter gradient!! Holla! Cross another nail art technique off my "I SO need to try that" list!

My base color was Orly Emberstone, from their OMFG-amazeballs Mineral FX collection (to date my absolute FAVORITE collection Orly has ever put out). Then I sponged on a random gold glitter that I think I may have gotten at Old Navy at some point (but don't quote me on that)...then some Seche Vite top coat and bodda boom boddabing--ya got a glitter gradient.
Now pray with me that I will find the time to upload and edit more pics so I can do more posts!!
Tuesday, August 21, 2012
Galaxy nails!
As I've mentioned in past posts, my boys are on a huge outer space kick, so of course I had to do galaxy nails to fit in with our ongoing theme! Since this was my very first attempt, I did a test nail on a wheel to start out with:


.JPG)


Not bad, eh? Pretty colors, just the right amount of glitter, some nice multi-dimensional sponging, a few dots here and there--the usual galaxy nail fodder...so I went ahead and did a full mani. Unfortunately, though, I don't think any of my nails turned out as good as my test nail did. Observe:


.JPG)
I think my fatal flaw here is I went a little overboard with the dotting tool. Plus I think the sponging got a little too heavy on some of the nails. Oh well, at least I tried. I'll definitely be trying this technique again soon! I have a whole bevy of pics I've saved from one of my favorite space nerd sites, Astronomy Picture of the Day, that I want to try and recreate on my nails!

Here are the polishes and tools I used for this particular galaxy:
Sally Hansen Insta-dri in Blazing Blue--base color
Kleancolor Holo Chrome layered over base
Sally Hansen CSM Purple Posy for sponging
Wet N Wild French White Creme for sponging and dots
a dotting tool
ripped up makeup wedges
metal palette (what I drip my polish on before I pick it up with sponges/brushes/dotting tools/whathaveyou
Are you a fan of galaxy nails? Have you ever tried them?
Monday, August 20, 2012
2 recent FOTDs featuring my beloved Sleek iDivine palettes
It's been forever since I posted an FOTD--mostly because I haven't been wearing a whole lot of makeup lately. We all that cosmetics + intense heat = eyes like Tammy Faye Bakker on a crying jag, so I've been opting mostly for either a completely nekkid face or just mascara + lip balm.
But my hunger for color got the best of me this weekend and I busted out my Sleek i-Divine palettes and went to town. This is what happens when I go on a DVR RuPaul's Drag U viewing binge. I am absolutely endlessly inspired by drag queens, their astounding makeup wizardry & their ability to use color, contour, light, shadow--and of course glitter--to whip up a wholly different persona for themselves to inhabit. Oh if I only had those kinds of skills...
Saturday's Look:
.JPG)


~~PRODUCTS USED~~
Face:
E.L.F. Translucent Mattifying powder
E.L.F. HD powder
NYC Color Wheel Allover Bronze Glow
NYC Color Wheel Pink Cheek Glow
E.L.F. Golden Bronzer (as highlight)
Eyes:
Garnier Anti-Dark Circle eye roller
NYX HD eyeshadow base
Sleek Curacao i-Divine palette
Sleek Ultra Matte Vol 1 i-Divine palette
Maybelline Lasting Drama gel liner
Wet N Wild ColorIcon shadow single in Panther
Jordana Extreme Volumizing Mascara
Wet N Wild Acapulco Glow bronzer (to blend out shadow and highlight browbone)
NYC brow kit
Lips:
L'Oreal Colour Riche Audacious Amazon lipstick (from last year's Project Runway LE collection)
Sunday's Look:


~~PRODUCTS USED~~
Face:
Physicians Formula Healthy Wear Powder foundation in Translucent Light
E.L.F. HD Powder
NYC Colorwheel in Pink Cheek Glow
NYC Colorwheel in Allover Bronze Glow
Wet N Wild Bronzer as highlight
Eyes:
Garnier Anti-dark circle eye roller
NYX HD eyeshadow base
Sleek Curacao & Ultra Matte Vol 2 i-Divine Palettes
Wet N Wild ColorIcon shadow single in Panther
Jordana Extreme Volumizing mascara
NYC brow kit
Lips:
L'Oreal Colour Riche Audacious Amazon
Revlon Colorburst Lipgloss in Decadent
Who are your glam idols & makeup inspirations?
Sunday, August 19, 2012
Hot holy holo--Jade Magia Negra
The sun came out today, so I took the opportunity to bust out the Jade Holografico polishes I just got from http://shop.llarowe.com/ (AKA, magical polish shop that bestows foreign & indie hard to get polishes upon the lacquer loving masses)!
Of course, I had to start with the black holo--Jade Magia Negra. Really I need to just shut up and show the pics:


Of course, I had to start with the black holo--Jade Magia Negra. Really I need to just shut up and show the pics:
(click to enlarge)


Jade Magia Negra-- $10.00 for 8ml
:::flat line:::: someone get the defibrillators!! This makes my black holo polish loving heart sooo happy!! This is no dull charcoal polish masquerading as black like so many holo polishes I've tried before. This is truly the blackest holo I've seen--blacker than Hits Zeus and Glitter Gal's 3d holo black (I'll post comparison swatches soon) and, though I don't have the polish myself so can't say for certain, I betcha anything it's blacker than Layla Flash Black.
And the formula?? LOVE!! This is 1 coat of Magia Negra over 1 coat of Wet N Wild Black Creme. The polish laid itself down on the nail absolutely perfectly--none of the usual diva holo issues like streaking or balding--no special water base coats needed, no need to buff nails down to freshly zambonied ice slickness. I'm thinking that polish brush is really a magic wand that just zapped my nails full of rainbows. And Seche Vite doesn't dull this holo either (another common issue with certain holos). Oh Jade, you are so easy to please. Other holos could learn so much from your chill, down to earth, laid back nature.
If you want a bottle of this, go see Leah Anne, the foreign/indie polish fairy at her shop. She's out of Magia Negra right now but she frequently restocks. You can keep up to date on restocks by following Llarowe on Facebook and Twitter. She also has an email newsletter you can sign up for.
Friday, August 17, 2012
Essie Stroke of Brilliance is, well, a stroke of frickin brilliance!!
OMG, you guys, Essie has me swooning again. It's one of those "can't stop staring at my nails" days, thanks to Stroke of Brilliance, the newest addition to Essie's Luxeffects glitter topcoat line. The pictures don't even come close to capturing the "hammina hamminaness" of this polish!!


click pics to enlarge

outside sun

outside sun

outside shade--look at all dat SHINY!!!

outside shade

I promise you this polish is about 5 zillion times more sparkly and drop-dead gorgeous in real life. Large hex glitters and micro glitters together in a clear base and they are the most breath-taking periwinkle blue that just barely walks the line between sky and lavender. This is actually a relatively simple glitter compared to the stuff I've been obsessed with lately--like 40 million shapes, sizes and colors in one bottle or holy holo crazyness--but Stroke of Brilliance has totally stolen my heart. It's just uncomplicated and stunning and I freakin love it!
It gave me no trouble formula-wise. The glitters come out of the bottle easily, spread out nicely on the nail, you don't have to fish for the larger pieces and the base is the perfect consistency. Well done, Essie!!
In the above photos, I have 2 coats of Stroke of Brilliance layered over 3 coats of Wet N Wild Rain Check, a blue-tinged silver frosty metallic polish that, unlike S of B, was a total pain in the butt to work with. Sheer as heck and brush-stroke ridden. Good thing I only paid $.69 for it! (Thanks be to Rite Aid and its current Wet N Wild sale--all $.99 products reduced to $.69 this week)...
So what do you think? Are you as smitten as I am?
Thursday, August 16, 2012
NYC Haunted and Enchanted polishes for Halloween 2012 swatches and review
If you saw my post from yesterday, you know I came across a plethora of brand new Halloween makeup displays at Rite Aid. The New York Color display had some intriguing polishes that I of course snatched up right away & I couldn't wait to try them.

On the left is Haunted and on the right is Enchanted. Haunted is a black jelly polish with gold hex glitters. Enchanted has the same glitters but in a shimmery white base.
Click to enlarge. All swatches taken in outdoor sun.


Ok, lets start with Enchanted.
I had such high hopes for this polish. You don't see too many white polishes with glitter in them in the drugstores. When I was in Rite Aid under those whacko flourescent lights, I couldn't tell what kind of base polish I was dealing with. My hopes were that it was some kind of white jelly polish because a white jelly polish with awesome gold hexes suspended in it would be EPIC.
Alas, when I got home and swatched Enchanted, though, there was no jellyness in sight. Nope. Just a frosted white mess...nasty and dated and brush-strokey (my photos above are actually being very kind to this polish. In real life, every stroke of every brush hair is apparent). And the glitter? Well it gets smothered by the frosted white base and the under layers of glitter end up looking less like glitter and more like bubbles and bumps. Yuck. As far as opacity goes, at 3 coats, there is still some visible nail line. Double yuck.
Haunted had its own set of issues. I actually really love the final look of the polish. The sparse gold glitters against the black background remind me of the starry night sky my boys and I have been spending so much time exploring lately. Formula-wise, though, Haunted is very problematic. It's thick and it has major dragging and balding issues. You have to wait until each coat is fully dry before you can proceed with the next. Otherwise, you're gonna end up with a streaky, draggy nasty mess. Also, you have to be careful with how you lay down your strokes so the glitters don't get completely eaten up by the black base. Despite the polish's thickness, it still took 3 coats to reach full opacity and it needed a generous coat of Seche Vite to get it completely even.
So my final verdict on these polishes? They're a nail fail unfortunately. If they weren't so cheap ($1.99 each and I got them on a BOGO 50% off), I'd take them back to the store. I guess I'll keep Haunted because I MIGHT wear it again one day; it looks like it might be an interesting base for galaxy nails. But Enchanted is definitely destined for another home. Oh NYC, WHY couldn't you make that frosted white base a jelly base instead??
Wednesday, August 15, 2012
Halloween Makeup collections beginning to pop up at Rite Aid!
Ok, once again, before I even start, let me apologize for my absenteeism. We've been incredibly busy lately getting the boys ready to go back to school and trying to squeeze all the fun we can out of our last days of summer vacation. Once the boys start school again, you'll be hearing from me much more frequently. For now, just know that I appreciate all my awesome readers and all the wonderful comments you leave and even if I don't get a chance to always post responses, each line you drop makes my day!
Alrighty, so now that we got that out of the way, I have lots of pics of lots of exciting halloween sightings I came across today when I was in Rite Aid. Seems like these displays pop up earlier and earlier each year, but I kinda sorta LIVE AND DIE for ALLTHINGS Halloween, so I'm excited to see them despite the fact that it is no where near October.


Alrighty, so now that we got that out of the way, I have lots of pics of lots of exciting halloween sightings I came across today when I was in Rite Aid. Seems like these displays pop up earlier and earlier each year, but I kinda sorta LIVE AND DIE for ALLTHINGS Halloween, so I'm excited to see them despite the fact that it is no where near October.
OK, onto the pics! BTW, If you are a lover of red eyeshadows, you DEFINITELY want to keep reading.
First up, the annual Rite Aid Blue Cross pumpkin polishes are back! Lots of neon glow-in-the-dark offerings this year...I was disappointed that there were no awesome glitters this time around, but these polishes have a habit of varying widely from Rite Aid to Rite Aid so it is possible that this particular store only had these and there may be glittery pumpkin awesomeness to be had elsewhere.

Next, we have some Fantasy Makers awesomeness. I LOVE me some Fantasy Makers--of course--because it is made by Wet N Wild and this year, they have these awesome eyeshadow/nail polish/lip stick/lashes look kits! Each "Wicked Look" kit is $4.99.

Please forgive my awful cell phone pics. The kit in the upper left is called "Siren" and it includes a purple polish, a purple and blue eyeshadow duo, a mauve-looking lipstick and silver tinsel lashes. The upper right kit is "Vixen"--tomato red polish with a black and TRUE RED shadow duo (it appears to be the same red that has made appearances in past LE Wet N Wild shadow collections), tomato red lippie and more tinsel lashes. Bottom left is Temptress, which consists of a charcoal and bright pink shadow duo, a vampy red polish , vampy red lipstick and some long human hair-like lashes. Witch is the final kit here and this baby has a black and white shadow duo, a black polish and a black lipstick, plus some interesting clustered lashes.
Now we all know how much Wet N Wild shadows rock, so I am very excited to see these shadow duos! Also, I couldn't help but notice that the lipsticks look like mini Mega-last lipsticks, the incredibly, deservedly popular new for 2012 lipstick formula that Wet N Wild released this year.

Next to the "Wicked Look" kits, they had "Hauntingly Hip" kits that consist of heavily glittered cream shadow palettes and stencils. There's a devil kit that consists of reds, oranges & a grey and some flame stencils; a butterfly kit that is more of a "brights" themed color palette, an angel kit which is an earth-toned palette and a swan kit that, other than the white shadow, seems to be made of "jewel-toned" shades.

Above is yet another Fantasy Makers offering--temporary hair color and colored mascaras.

Aaaaand even more Fantasy Makers--this time we have body glitters, glitter eyeliners and bottles of beautiful holographic glitter. Fantasy Maker fanatics like me will recognize that amazing little bottle of holo glitter--yep it is the same one they offered last year and I am SO glad to see it as I wasted my bottle last year in a horribly botched frankenpolish attempt. Now I can get a replacement and back-ups!!
OK, lets move onto our New York Color section of this post (these "spotted" posts always end up a million years longer than I originally imagine)...

Here we have the "Sweet and Devilish collection. The lipsticks in this collection are LE City Duets lipsticks--one is a red/black duo and the other is a white/gold duo.

The polishes--a white pearl with gold glitter and a black with gold glitter. Of course, I got both of them. There is also a mysterious "Demon Glow" top coat. Not sure what that is about. It doesn't contain any glow-in-the-dark particles that I can discern--just looks like a "dressed up for Halloween" version of a regular topcoat to me but maybe I'm missing something.

Eyeshadow duos! We have a pearly white & a gold duo and--GASP--another TRUE red drugstore shadow offering! This one is a matte red paired with a matte black.

The bronzers in the display--a gold and white shimmer duo. (I'm so sorry I neglected to get the shade names of all these)...

And finally, we have some liner duos--a black and red duo and a white and gold duo to go with the shadow duos. All in all a very exciting collection!
So are you digging any of these offerings?? Oh how hard it was to NOT walk out of the store with everything I saw!!
Saturday, August 11, 2012
Jupiter nails!!
My kids are on a huge outer space kick right now. In the past few weeks, we've made 2 model solar systems, watched pretty much every space show on Netflix, stayed up til all hours of the night to watch live coverage of Curiosity's landing on Mars and we're very excited for this month's blue moon on the 31st and the upcoming meteor showers...
Somehow, my kids interests always get translated into manicures for me--partly because I just get inspired by what we are consuming at any given time and partly because I love how they get such a kick out of seeing their favorite things painted on mommy's nails. Their favorite planet is Jupiter, so I did my first water marble ever to make Jupiter nails. Yes I am aware of the geekdom involved in rocking Jupiter nails. I own it and love it. Snort.


Somehow, my kids interests always get translated into manicures for me--partly because I just get inspired by what we are consuming at any given time and partly because I love how they get such a kick out of seeing their favorite things painted on mommy's nails. Their favorite planet is Jupiter, so I did my first water marble ever to make Jupiter nails. Yes I am aware of the geekdom involved in rocking Jupiter nails. I own it and love it. Snort.

left hand


left thumb

rarely seen right hand

almost never seen right thumb

posing with the big model Jupiter from the solar system mobile in my boys' room

posing with the little Jupiter from our mini solar system model
It's not that bad for my very first water marble, right? I mean, I accomplished what I set out to do--I think my nails do look rather Jupiter-esque. Post-mani clean-up was hell, though. Frickin polish EVERYWHERE. I'm messy to begin with no matter what I do, but when I use a messy nail art technique, then it's like mess on Steroids.
I don't know if I'll be attempting a water marble again any time soon. Aside from the mess (did I mention it was messy?!?!), I was kind of perturbed by how much polish this mani used up! Not that I have any kind of polish shortage in my life, mind you. I just hate seeing 4 bottles of polish 1/4 of the way gone just to do 10 little nails.
Polishes used in this mani:
Finger Paints Papier Mache (white--used as base color and in the marble)
Sally Hansen Xtreme Wear Sunny Side (yellow)
Sally Hansen Xtreme Wear Red Rebel (orange--yea I don't know why she's calling an obvious orange red, either)
Sally Hansen Xtreme Wear Cherry Red (now THAT'S a red, Sally)
Seche Vite top coat
Of course now that they've seen this mani, my kids want me to do all the other planets on my nails. So don't be surprised if this blog features more finger nail geekery in the near future...
Have you ever tried water marbling? Thoughts? Tips?
Subscribe to:
Posts (Atom)